Is the game over or has it just begun?
With the eighth instalment in the Saw franchise being released today, one fan has created his own remote controlled ‘Billy’ puppet. The Saw films focus on John Kramer (aka the Jigsaw killer) who sets a series of tests for his victims in which he tests their will to live. Rather than appearing in person to set his tests, Jigsaw uses the Billy puppet to explain the rules of the game.
Posting on the website Instructables, self-proclaimed ‘huge geek’ david0429 explained how he created the authentically creepy remote controlled puppet.
The project required 12 pain-staking stages (but perhaps not as painful as those experiencing the traps…) and here is a brief résumé of what is required.
Step 1: The tricycle
First things first is to acquire Billy’s vehicle of choice: a children’s tricycle.
Step 2: Drive motor
To move Billy around, a single geared DC motor was used (a DC motor with a gearbox built onto it). It made for simple continuous motion and easy speed control when using PWM or a motor hat.
Mount
This was designed in Solidworks and then 3D printed.
Wheel
A cylinder that had a slot out of it to mount onto the motor. Like the mount, this was also 3D printed.
Once it was printed, 2 layers of rubber gasket were added around the outside of it. This made the wheel larger, but also made it compressible, which gave it better contact with the front wheel.
Mounting
The fully glued wheel (with gasket and elastic) were press-fit onto the motor.
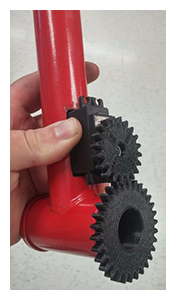 Step 3: Steering mechanism
The gears were designed in Solidworks and then 3D printed.
Servo gear
This gear was made in a similar way to above, but with a 2:3 gear ratio. This ratio was chosen because david0429 wanted to make sure the servo had enough power to turn the steering without stalling, and the servo could only turn 180°, but the actual trike didn't need to turn that sharply.
Mounting the servo
In an attempt to hide the servo as much as possible, it was placed inside the frame of the tricycle.
Step 4: Wiring
David used a Pi hat, so minimal extra electronics were required. The struggle was routing the wires in a way that was subtle.
Wiring the drive motor
This motor needed just two wires soldered onto it, as basic as control gets. Getting those wired from under the front fender to under the seat (where the electronics would live) was the challenge.
Power
All of the power for Billy comes from some portable USB chargers. They are easy to charge, hold a decent amount of power, and can be easily upgraded later. To mount them, David used double-sided tape and some little 3D printed stand-offs.
USB cables were cut and split so they could be wired into the motors. A really short micro USB cable was routed to the Pi. 3 USB cables powered the entire thing.
Step 5: Software
According to David, the software wasn’t overly complicated. He created a separate document just on this topic which you can view here.
Step 6: Quick test
Before Billy took his seat, David tested out the tricycle.
Step 7: Audio
Billy’s sinister laugh is one of his most iconic attributes.
Software
David added a callback for playing audio from the web interface. It is a simple function that takes the name of the file as a variable from the web interface. Pygame will start the sound playing and return immediately. This makes it so you can still have control while the sound is playing.
Hardware
The hardware is also pretty basic. With time running low, David used a battery powered Bluetooth speaker.
 Step 8: Billy’s body
Billy has the proportions of a young child, but his overall height was dictated by the size of the tricycle. His ‘skeleton’ was made from wood.
Legs
The legs are a special case because they need to hold themselves up at an angle. David changed the legs to use a single small screw as a hinge. This kept the legs from spinning.
Once the legs were done, two blocks of wood were attached as ‘feet’. Having feet made it easy to take Billy off the trike as his feet could be taken out of the shoes. They were attached directly so there was no flex in the ankles. This kept the pedals flat like how they would sit in reality when being used.
Step 9: Billy’s head
Like many other components in this make, the head was 3D printed, with a little ‘shelf’ being created around the mouth to leave the option for a mouth motor.
Step 10: Putting it all together
The back mount was just a piece of extrusion bolted onto the seat. It was an easy way to attach Billy without ruining the suit.
Head
To give Billy a neck, David used a wood block shaped with a Dremel. The middle was hollowed out so the corners were higher than the rest of the piece. Since the bottom of the head was rounded, this was the easiest way to make sure it was stable.
Step 11: Dress him up!
Typically, Billy wears a black suit, white shirt, and red shoes. His hands were made from 16 gauge steel wire, with one wire per finger. David made use of a tuxedo his grandma had made when he was a child.
Step 12: Enjoy your hard work
The final product is definitely impressive. David had a few improvements he would make, however.
Quieter motors
All of the motors are pretty loud. When you are going for creepy, quiet is good. These motors are not that.
Faster Drive
In an attempt to hide the drive motor, it ended up making it drive too slowly. He would redesign the drive system to give it some speed
With Halloween fast approaching, maybe you’d like to have a shot at making your own Billy? Find out the full instructions on Instructables.
Credit: david0429, Instructables
Product Spotlight
APV1111GVY
Panasonic
Panasonic PhotoMOS® Photovoltaic MOSFET High-Power Drivers
| SKU: | |
|---|---|
| Stock: | 3490 |
| Cost: | $3.95 |